Launcher SDK
PatchKit Launcher SDK provides all necessary tools to develop, test, and deploy launchers within PatchKit.
Development Requirements
To work with the SDK projects, you need a few things installed on your development machine:
- NodeJS (version 22.x or higher)
- A package manager of your choice (we recommend yarn, although others like npm and pnpm should work as well)
API Documentation
Here you can find documentation for Launcher SDK API.
Quick Start
To quickly bootstrap your project, you can use the SDK Project Creation Wizard accessible through the following command:
yarn create @upsoft/patchkit-launcher-sdk-project
The wizard will ask for your launcher id, name, company id/name, app catalog id, and preferred package manager, then download the PatchKit Demo Launcher project template and pre-fill your answers into the preset files.
We recommend storing your project source on a VCS like Git as soon as possible to easily track changes you make to the project.
The scaffolded project has two packages - runtime/ and theme/ - plus a root .env.example file used later for publishing. Dependencies are installed for you; you can start right away.
Let’s start by running the theme in development mode:
cd theme
yarn run dev
And once the theme is running, open a new terminal window and start the runtime. There are convenience scripts for each platform:
cd runtime

# Windows
yarn dev:win

# macOS
yarn dev:mac

# Linux
yarn dev:lin
These are thin aliases for the underlying dev-patchkit-basic-launcher-runtime command - check runtime/package.json for the full invocation.
If port 5173 was occupied, the theme was most probably started on a different one - use it instead (should be printed after executing the yarn run dev command).
If you’re using nvs/nvm to manage your NodeJS versions, remember to switch to the correct version before starting the runtime.
As you do that, you will see a launcher window appear. The library of games in it is a library of games of PatchKit Demo Launcher, which you can easily switch to yours later on. The theme has hot-reloading enabled, so any changes you make to it will be instantly reflected in the launcher.
Core Concepts
Dual Component Nature
The PatchKit Launcher SDK structures the projects into two separate components:
- Runtime - an application installed on the user’s machine, supplying core functionality like creating a window, loading the theme, installing/updating apps, managing data, etc. (you can think of it as a custom web browser that provides additional API for launcher-oriented features)
- Theme - a user interface built with frontend technologies, allowing you to completely customize your launcher (you can think of it as a frontend that utilizes additional API exposed by the runtime)
These two components are deployed individually:
| Component | Reason to deploy | How update is acquired |
|---|---|---|
| Runtime | In most cases only when you upgrade versions of SDK packages in your project. | Self-update mechanism downloads the latest runtime version and offers the user an option to install it (restarting the launcher is required, a custom flow can be implemented as well). |
| Theme | Whenever you make any changes to the theme. | Upon restarting, the launcher will always pick the latest compatible theme version (the theme itself can also detect that a new version is available and request the window to reload with the latest version). |
Each component is made out of a separate NodeJS package (in the case of the PatchKit Demo Launcher project, packages are placed in runtime and theme directories).
Compatibility
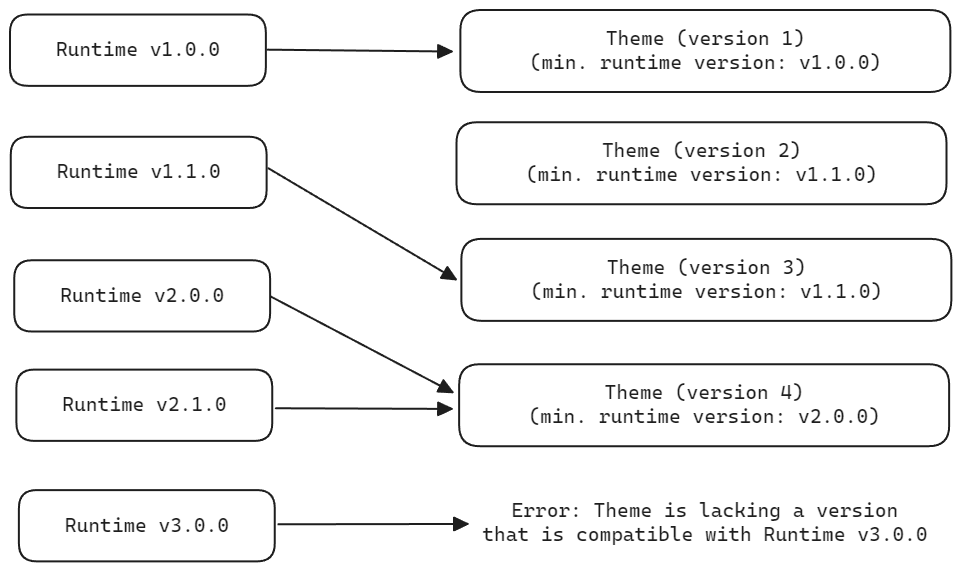
To ensure compatibility, theme versions are always marked with the minimum required version of the runtime - this way the runtime always picks the latest version of the theme that is compatible and guaranteed to work (compatibility is decided upon checking if the minimum version of the runtime satisfies the ^runtime_version semver constraint). The diagram below illustrates an example scenario:
Runtime
The runtime component is made out of a NodeJS package depending on @upsoft/patchkit-basic-launcher-runtime-package-dev-tools. This package provides the following commands:
build-patchkit-basic-launcher-runtime
Usage:
build-patchkit-basic-launcher-runtime --presetFileName <presetFileName> [--uploadRuntime] [--publishRuntime]
Environment Variables:
PATCHKIT_API_KEY- mandatory when using--uploadRuntimeAPPLE_API_KEY_FILE_PATH- path to the.p8API key file, mandatory when code signing macOS Launcher (API key auth)APPLE_API_KEY_ID- App Store Connect API Key ID, mandatory when code signing macOS Launcher (API key auth)APPLE_API_ISSUER- App Store Connect API Issuer ID, mandatory when code signing macOS Launcher (API key auth)APPLE_ID- mandatory when code signing macOS Launcher (Apple ID auth, alternative to API key auth)APPLE_ID_PASSWORD- mandatory when code signing macOS Launcher (Apple ID auth, alternative to API key auth)
Before code signing your launcher on macOS, you need to be enrolled in the Apple Developer Program and have a Developer ID Application certificate. You can find more information on how to do it here. On Windows, you need to have a code signing certificate. You can find more information here.
dev-patchkit-basic-launcher-runtime
Usage:
dev-patchkit-basic-launcher-runtime --presetFileName <presetFileName> --overrideThemeUrl <overrideThemeUrl> [-- <runtimeProcessExtraArgs>]
Sensitive information like API Key / Apple ID Password are passed through environment variables to reduce the risk of being leaked.
You can use these commands:
- Directly with
yarn, for exampleyarn dev-patchkit-basic-launcher-runtime - Directly with
npx, for examplenpx dev-patchkit-basic-launcher-runtime - By aliasing them in the
scriptsfield of package.json (example)
Environment variables and the .env file
The scaffolded project ships with an .env.example file at the repo root. Copy it to .env and fill in the required values before publishing:
cp .env.example .env
# Required for publishing runtime and theme
PATCHKIT_API_KEY=

# macOS notarization (required for publish:mac)
# Choose one method:

# Method 1: Apple ID credentials
#APPLE_ID=
#APPLE_ID_PASSWORD=

# Method 2: App Store Connect API Key
#APPLE_API_KEY_FILE_PATH=
#APPLE_API_KEY_ID=
#APPLE_API_ISSUER=
The ready-made publish:mac, publish:win, and publish:lin scripts in runtime/package.json load this file automatically via dotenv-cli, so you don’t need to export the variables in your shell. For example:
cd runtime

# Build and publish the macOS runtime
yarn publish:mac

# Build and publish the Windows runtime
yarn publish:win

# Build and publish the Linux runtime
yarn publish:lin
.env is listed in .gitignore by default - keep it that way. Never commit your PATCHKIT_API_KEY or Apple credentials.
Presets
Both commands require you to supply a so-called “preset file”. These are TypeScript-based configuration files used to describe all necessary stuff for the runtime to properly start or build.
The concept of presets allows you to have different variants of your launcher. Common use cases for having multiple presets are:
- To target multiple platforms (Windows, macOS, or Linux)
- To separate development/internal and production versions of the launcher
Check out the PatchKit Demo Launcher runtime package to see how those can be structured. Complete documentation for preset properties is available in the API documentation here.
The scaffolded project splits presets into three layers that are composed with mergePartialPresets:
shared-base-preset.ts- company-level defaults (company id/name, window size, assets, protocol, tray).shared-prod-base-preset.ts- launcher-level identity (id, name, description, app catalog id, protocol id) that extends the base.windows-prod-preset.ts/macos-prod-preset.ts/linux-prod-preset.ts- platform-specific overrides (secret, icon, code signing) that extend the shared prod base plus a platform base preset.
shared-base-preset.ts
import * as PatchKitBasicLauncher from "@upsoft/patchkit-basic-launcher-runtime-package-dev-tools";

export const SHARED_BASE_PRESET = {
  companyId: `acme`, // IMPORTANT - this cannot and should NOT be changed once the runtime is deployed for the first time.
  companyName: `Acme Corp`,
  window: {
    iconFileAssetId: `icon`,
    defaultSize: { width: 1280, height: 720 },
    defaultMinSize: undefined,
    defaultMaxSize: undefined,
    defaultIsResizable: true,
    isBorderless: true,
  },
  assets: {
    [`icon`]: { path: `./assets/icon.png` },
  },
  protocol: {}, // Enables protocol requests (aka. "deep links").
  tray: {}, // Makes the launcher appear in the system tray.
} satisfies PatchKitBasicLauncher.PartialPreset;
shared-prod-base-preset.ts
import * as PatchKitBasicLauncher from "@upsoft/patchkit-basic-launcher-runtime-package-dev-tools";
import { SHARED_BASE_PRESET } from "./shared-base-preset";

export const SHARED_PROD_BASE_PRESET = PatchKitBasicLauncher.mergePartialPresets(
  SHARED_BASE_PRESET,
  {
    id: `my-launcher`, // IMPORTANT - this cannot and should NOT be changed once the runtime is deployed for the first time.
    name: `My Launcher`,
    description: `My Launcher`,
    appsCatalogId: `<YOUR_APP_CATALOG_ID>`, // The ID of your app catalog - the launcher uses it as the source of applications.
    protocol: {
      id: `my-launcher`,
    },
  } satisfies PatchKitBasicLauncher.PartialPreset,
);
windows-prod-preset.ts (macOS and Linux follow the same shape)
import * as PatchKitBasicLauncher from "@upsoft/patchkit-basic-launcher-runtime-package-dev-tools";
import { SHARED_PROD_BASE_PRESET } from "./shared-prod-base-preset";

export default PatchKitBasicLauncher.mergePartialPresets(
  PatchKitBasicLauncher.WINDOWS_BASE_PRESET.value,
  PatchKitBasicLauncher.mergePartialPresets(
    SHARED_PROD_BASE_PRESET,
    {
      secret: `<YOUR_LAUNCHER_SECRET>`, // The launcher secret - lets the runtime find the proper theme and use self-updating.
      iconFilePath: `./icons/windows.ico`, // Icon used for setup and any shortcuts.
      codeCertificate: {
        subjectName: `<YOUR_CERTIFICATE_SUBJECT_NAME>`,
        sha1: `<YOUR_CERTIFICATE_SHA1_THUMBPRINT>`,
      }, // Optional - needed if you want to code sign the launcher (see below).
    },
  ),
) satisfies PatchKitBasicLauncher.Preset;
This layered structure keeps platform-specific files small and makes it easy to add new variants (e.g. an internal/dev preset) by creating a new shared-*-base-preset.ts layer.
Managing Runtime Version
The version of the runtime component is based on the version property from the runtime package.json. There are a few rules when managing it:
- you should always bump it when deploying a new version of the runtime
- if you’re upgrading the SDK with a major bump then bump the major part of the runtime version as well (as in most cases such updates introduce API breaking changes)
The version number of the runtime should be incremental. If you attempt to upload a runtime with a version number that already exists or is lower than the most recent one, the runtime’s auto-update feature may not function as expected.
Setting up Runtime on PatchKit Panel
- Open the PatchKit Panel.
- Navigate to the Applications page.
- Click the New Application button and then choose New Custom Electron Launcher from the popup.
- On the next form, provide the Electron Launcher name and platform, and then click the Create button.
- Instead of uploading the new version, go back to the Overview tab.
- Find and copy the Secret field to the clipboard.
- Fill the secret property in the specific preset file (like
windows-prod-preset.ts).
Code Signing for Windows Launcher
1. Obtain a Code Signing Certificate
First, you’ll need to obtain a code signing certificate.
2. View Certificate Details
Open the certificate details window. You can do this by locating your certificate in the Manage user/computer certificates or the SafeNet Authentication Client if you are using a USB token.
Steps:
- Switch to the Details tab.
- Locate the Subject property and note down the value of CN. Assign this value to a variable named
subjectName. For example:CN = UPSOFT sp. z o. o. ... subjectName = "UPSOFT sp. z o. o." - Find the Thumbprint property and note its value. Assign this value to a variable named
sha1.
3. Update Windows Preset Files
Add the codeCertificate field to your Windows preset file with the appropriate values you just obtained.
import * as PatchKitBasicLauncher from "@upsoft/patchkit-basic-launcher-runtime-package-dev-tools";

export default {
  // ...
  codeCertificate: {
    subjectName: `<YOUR_CERTIFICATE_SUBJECT_NAME>`, // Insert your certificate subject name here.
    sha1: `<YOUR_CERTIFICATE_SHA1_THUMBPRINT>`, // Insert your certificate thumbprint here.
  },
  // ...
} satisfies PatchKitBasicLauncher.Preset;
Finding Certificate Details in SafeNet Authentication Client
If you’re using the SafeNet Authentication Client, follow these steps to locate your certificate details:
- Open the SafeNet Authentication Client. It should be available in your system tray.
- Switch to Advanced view. You can find this option represented by a gear icon in the top right corner.
- Navigate through the list to find your certificate. Once located, double-click on it to view its details.
Code Signing for macOS Launcher
1. Enroll into Apple Developer Program
You can do it here.
2. Generate Developer ID Application certificate
Enter this page and select Developer ID Application option. Make sure to download the certificate and install it on your building machine.
3. Install Apple Intermediate Certificates
When you install your Developer ID Application certificate it’s going to be untrusted, making it unusable for code signing. To fix this, download and install Apple Intermediate Certificates from this page. You’re looking for two certificates:
- Developer ID - G1 (Expiring 02/01/2027 22:12:15 UTC)
- Developer ID - G2 (Expiring 09/17/2031 00:00:00 UTC)
Once you install them, your certificate should be marked as valid.
4. Install Command Line Tools for Xcode
Since the last step of building a code-signed macOS Launcher is notarization, you need to install the latest Command Line Tools for Xcode (or simply Xcode, Command Line Tools are just a more lightweight option). You can find them here. Make sure to download version 13 or higher.
5. Update macOS Preset Files
Add the appleTeamId field to your macOS preset files and fill it with your Team ID. You can find instructions on how to find it here.
import * as PatchKitBasicLauncher from "@upsoft/patchkit-basic-launcher-runtime-package-dev-tools";

import { SHARED_PROD_BASE_PRESET } from "./shared-prod-base-preset";

export default {
  // ...
  appleTeamId: `<YOUR_APPLE_TEAM_ID>`, // Insert your Apple Team ID here.
  // ...
} satisfies PatchKitBasicLauncher.Preset;
6. Set appropriate environment variables
There are two authentication methods for notarization. Choose one:
Option A: API Key Authentication (Recommended for CI/CD)
Create an App Store Connect API key at App Store Connect > Users and Access > Integrations > API Keys. Download the .p8 key file (only downloadable once) and note the Key ID and Issuer ID. Then set the following environment variables:
APPLE_API_KEY_FILE_PATH: path to the.p8API key file on diskAPPLE_API_KEY_ID: your API Key IDAPPLE_API_ISSUER: your Issuer ID
In CI/CD, you can store the .p8 key as a base64-encoded secret and decode it to a file during the build:
echo -n "$APPLE_API_AUTHKEY_BASE64" | base64 --decode > /tmp/AuthKey.p8
export APPLE_API_KEY_FILE_PATH=/tmp/AuthKey.p8
Option B: Apple ID Authentication
Enter this page and select the App-Specific Passwords option. Make sure to save the generated password somewhere. Then set the following environment variables:
APPLE_ID: email of your Apple accountAPPLE_ID_PASSWORD: App-Specific Password generated above
This option also requires appleTeamId to be set in your macOS preset file.
Once you supply the environment variables for either option, the building process should automatically code sign and notarize your macOS Launcher.
Please note that this significantly increases the build time as notarization involves sending the entire application to Apple servers for verification purposes.
Theme
The theme component is usually (as it doesn’t have to be!) made out of a NodeJS package with a frontend project. It can leverage packages like @upsoft/patchkit-launcher-runtime-api-theme-client to import the API exposed by the runtime.
Check out the PatchKit Demo Launcher theme package or API documentation for packages like @upsoft/patchkit-launcher-runtime-api-theme-client to learn more.
There is an optional @upsoft/patchkit-launcher-theme-package-dev-tools package that provides the following commands:
publish-patchkit-launcher-theme
Usage:
publish-patchkit-launcher-theme --themePresetFileName <themePresetFileName>
Environment Variables:
PATCHKIT_API_KEY- mandatory
Please note that this command is only responsible for publishing the theme. You still need to build your theme before you publish it (which usually involves running commands like vite build depending on your configuration).
You can use these commands:
- Directly with
yarn, for exampleyarn publish-patchkit-launcher-theme - Directly with
npx, for examplenpx publish-patchkit-launcher-theme - By aliasing them in the
scriptsfield of package.json (example)
The scaffolded theme package includes a ready-made publish script that builds the theme and publishes it in one go, loading PATCHKIT_API_KEY from the root .env file (see Environment variables and the .env file above):
cd theme
yarn publish
Theme Presets
Just like in the case of commands for the runtime component, publish-patchkit-launcher-theme requires you to create TypeScript-based configuration files to describe your theme.
Check out the PatchKit Demo Launcher theme package to see how those can be structured. Complete documentation for theme preset properties is available in the API documentation here.
Here’s an example theme preset file with descriptions for the most important properties:
import * as PatchKitLauncher from "@upsoft/patchkit-launcher-theme-package-dev-tools";

export default {
  id: `7ddd0afd-5c8e-405a-bcab-4de1f0ee20f4`, // Insert the id of your launcher theme to make sure that the publish command is able to find it
  distDirPath: `dist`, // Specify the directory where your frontend build artifact is located
  runtimeMinVersionLabel: `2.1.0`, // This determines the minimum version of the runtime that is supported by your theme
} satisfies PatchKitLauncher.ThemePreset;
Setting up Theme on PatchKit Panel
- Open the PatchKit Panel.
- Navigate to the Launcher Themes page.
- Press the New Launcher Theme button (pick the SDK Launcher Theme option).
- Find and copy the Theme ID field to the clipboard.
- Fill the id property in the specific theme preset file (like
prod-theme-preset.ts).
Associating a Theme to Launcher on PatchKit Panel
A newly uploaded theme is not immediately available to users. To make it accessible, you must associate it with a specific launcher. You can do this from the Launcher Themes page in the PatchKit Dashboard or through your launcher app settings.
- Open the PatchKit Panel.
- Navigate to the Launcher Themes page.
- Press the Edit button next to the theme you want to associate.
- Click the Assign to Launcher button.
- Choose the launcher you want to associate the theme with, and click the Assign button.
Now, your users can access the theme you’ve uploaded. The launcher may need to be restarted for the changes to take effect.
React Support
We supply additional API packages for themes made in React:
- @upsoft/patchkit-launcher-runtime-api-react-theme-client
- @upsoft/patchkit-launcher-runtime-api-react-theme-extras
Possible routing issues
To ensure your theme is compatible with the deployment option on the PatchKit Panel, you need to adjust the routing method you use. Since the theme is going to be deployed in a subdirectory, you can’t assume the absolute path to your application at build time. Therefore, we recommend using solutions like HashRouter from react-router / createHashHistory from @tanstack/react-router to avoid any issues after deployment.
Sharing your launcher
Once both the runtime and theme components have been deployed and properly configured, you can distribute your launcher to the end-users. You can do so by navigating to your launcher application page on the PatchKit Panel (the Overview tab) and finding the Download Link in the Details frame on the right side of the page.
FAQ
Do I need to update the runtime each time I update the theme?
No, you don’t. The runtime is responsible for fetching the latest version of the theme from the PatchKit servers. Therefore, you can update the theme without the need to update the runtime.
When should I update the runtime and what changes can I expect?
You should update the runtime only in two cases:
- You modified the presets
- You upgraded the SDK version
Should the launcher pop up as a window when I run it?
Yes, the launcher should pop up as a window every time it’s executed.
What if the launcher doesn’t show up even after the process seems to start successfully?
There could be multiple reasons for this, one being potential issues with Windows 11’s features of restoring apps. You might need to look for specific executable instances and close them or restart your computer.
Where can I find the logs for the launcher?
You can access launcher logs with the Ctrl+Shift+D shortcut.
What should I do if the logs are empty or not found?
If logs are not available, please consider reaching PatchKit Support and giving us details about the issue.
Can deep links be used with the SDK Launchers?
Yes, deep links are fully supported.
How should I use Patchkit for different environments like prod and dev?
Some clients use a double launcher setup with a production launcher connected to their production app catalog and an internal launcher connected to the internal app catalog. You can also utilize branches, but managing them in your theme is necessary.
How can I detect the runtime my theme is currently running in?
You can use the PROTOCOL_INFO variable exposed from the @upsoft/patchkit-launcher-runtime-api-theme-client package - it gives you the id of the runtime’s registered protocol (when configured).
How do I revert to a previous version of a theme?
To revert to a previous version of a theme, you must delete all newer versions of the theme. You can do this from the Launcher Themes page in the PatchKit Panel by clicking the Delete button next to the version you want to remove.