Launchers

Launchers Overview

A launcher is a desktop application that manages the installation, updating, and maintenance of the game or application. It also handles authentication and collects usage data.

PatchKit Launchers

PatchKit offers two types of launchers: Unity-based and Electron-based. The following table highlights the differences between the two:

Feature Unity-based Electron-based
Technology Built with Unity engine Built with Electron
Operating System Windows, macOS, Linux Windows, macOS, Linux
Initial Size Approximately 30 MB Approximately 80 MB
Open Source Yes No
Customization Yes (through Unity editor) Yes (through SDK)
Self-Upgradeable Yes Yes
Availability Automatically built for all apps Available on request
HTML5 Support No Yes
Multiple Games Support No Yes
Performance May be slow for large applications (>10 GB) Fast for all applications
Web2 Authentication Yes (license keys and external) Yes (all types)
Web3 Authentication No Yes (uses Chrome extensions)
Embedded Installer No (deployed as a zip file, can be embedded in an installer) Yes

Which launcher is best for me? The choice of launcher depends on your specific needs. Both launchers can be used with any application, regardless of the game engine used. If you’re unsure which one to choose, we recommend scheduling a demo call with our team. This will give you the opportunity to discuss your needs and get personalized advice. Click here to schedule a demo call.

Acquiring the Launcher

A Unity-based launcher is built automatically for each application that has at least one published version. You can download it by navigating to your application page and then by clicking on the Get Launcher button.

The electron-based launcher on the other hand needs to be built and uploaded manually. Currently, this is done by PatchKit team on request.

Unity Launcher

Customization

For the Unity launcher, you can freely customize it by downloading the source code from GitHub repository and by opening in the Unity editor. It’s required to use version Unity 2018.4.x of the Unity editor. You can easily download it from Unity Hub.

You do all the customization in the Patcher scene. Make sure to copy it and perform all the modifications on that new copy. Otherwise, you may have hard time upgrading your launcher to the latest release from the source code.

To build it, choose Tools / Build / PLATFORM from the main menu where PLATFORM is your platform of choice.

Do not build the launcher using File menu. It could not include the required manifest file in the target directory and may result in a broken build.

Uploading

Now when you have your new launcher build, you have to upload it to your PatchKit account.

  1. Navigate to publisher panel applications page.
  2. Click the New Application button and then choose New Launcher from the popup.
  3. In the new application form, name your launcher (e.g.,My Launcher Windows 64) and click the Create button. Shortly after, you should be able to see your new application.
  4. Now click the New Version button.
  5. Edit the new version Label to, let’s say, 1.0.
  6. Click the Upload Content button.
  7. Compress the directory of your launcher into the zip file. Make sure that the patcher.manifest file can be found next to the launcher executable.
  8. Choose that newly created zip file as your application content.
  9. Wait for the upload and version processing to finish.
  10. If there are no errors, click the Publish button.
  11. After the version is published, navigate to your game’s page.
  12. Inside Configuration panel look for Custom Launcher field. Click on the Edit button right next to it.
  13. From the drop-down, select your new launcher.
  14. Click on the Save button.

From now on, your new application is using your custom launcher instead of the default one.

Troubleshooting

If it comes to troubleshooting the Unity-based launcher, there are two main steps you can take:

In both cases it’s important to provide the logs and the version of the launcher. Below you can find the instructions on how to get them.

Getting the Logs

Getting the logs is the first step in troubleshooting issues with the Unity-based launcher. The logs can be found in the following locations depending on the operating system:

The logs can be accessed in two ways:

  • By pressing CTRL+SHIFT+D in the launcher window, then choosing the Open Launcher log file location option.
  • By navigating to the following locations:

Windows

  • C:\Users\USERNAME\AppData\LocalLow\UpSoft\PatchKit Patcher\output_log.txt

GNU/Linux

  • ~/.config/unity3d/UpSoft/PatchKit Patcher/Player.log

Mac OSX

  • ~/Library/Logs/Unity/Player.log

Note that if you’ve changed the Company Name and Product Name in the launcher settings, the log file location may be different. For more information, please refer to Unity’s documentation.

Finding the Installed Version

To find the version of the installed Unity-based launcher, you can follow these steps:

  1. Search for the launcher log file (output_log.txt or Player.log)
  2. Open the log file
  3. Look for the version number in the first lines of the log file, it should look similar to this:

2022-03-16 11:12:01.154 +01:00 [ DEBUG ] <Patcher::Awake> patchkit-patcher-unity: v3.17.11.0

Electron Launcher

The electron-based launcher can be customized using PatchKit Electron Launcher SDK.

Customization

There are several ways to customize the launcher:

Visual Editor (WYSIWYG)

This feature is currently in beta. If you encounter any issues, please contact us.

At the moment, only Windows games are supported. Support for macOS and Linux will be added in the coming weeks.
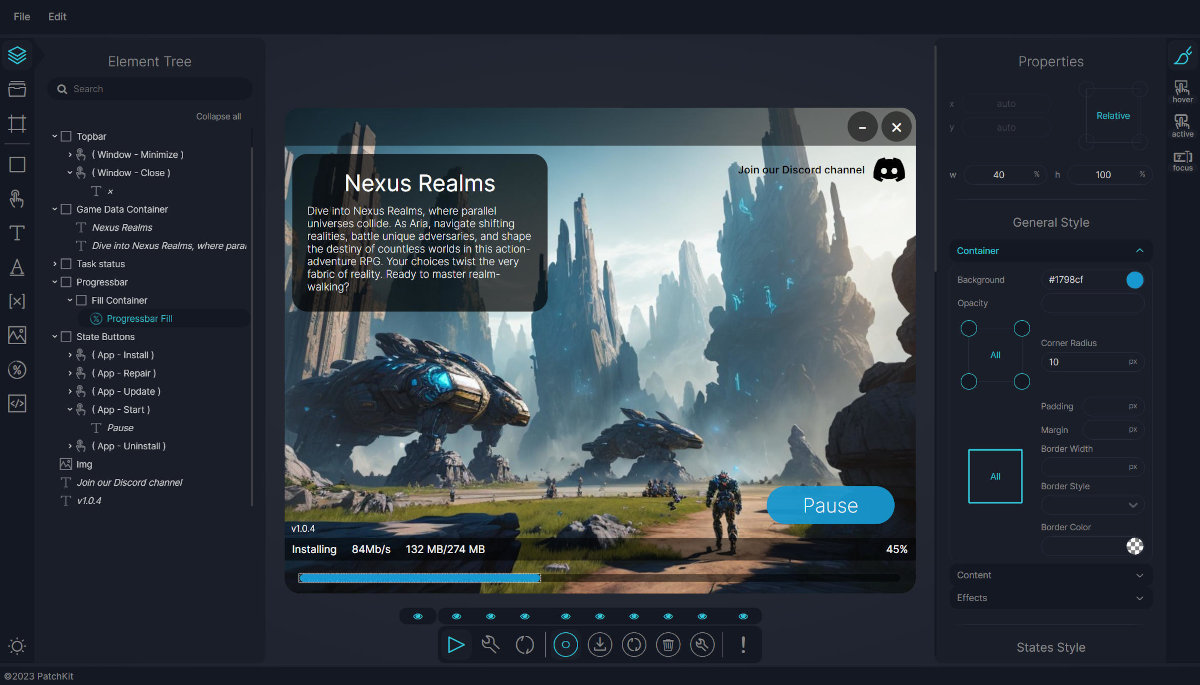
Visual Editor

The PatchKit Launcher visual editor is a tool that allows you to customize the launcher without the need to write any code. It’s available for all PatchKit users and can be accessed from the PatchKit Dashboard by clicking on the Launcher Themes link in the left sidebar.

To create a new editor theme:

  1. Click the New Launcher Theme button.
  2. Click the Create Editor Theme button.
  3. Click the Open in Editor button.

Interface Basics

Once you open the visual editor, you can use it to customize the launcher theme. The editor is divided into several sections:
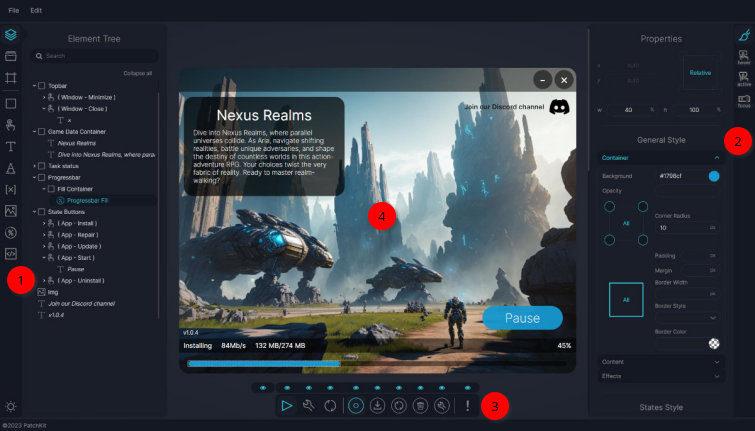
Visual Editor Elements

  1. A left toolbar that includes tools such as Element Tree, Assets, Window settings, and all the elements that can be added to the theme.
  2. A right properties bar that allows you to change the properties of selected elements.
  3. A bottom states bar that lets you switch between different launcher states and define in which states the currently selected element should be visible.
  4. The main canvas where you can preview your theme.

Saving the Theme

When you’re finished working on your theme, select File -> Save to create a new version of the theme. You can view and revert to any of your past versions by selecting File -> Version History from the main menu.

Once the version is saved, navigate back to the theme page on the PatchKit Dashboard and associate it with your launcher app. To do so, click the Assign button and choose your game from the list.

Now, download and run the launcher from your game page. You should see your new theme in action.

Once assigned, your game will always use the latest version of the theme.

FAQ

Can I use the visual editor with a launcher created with the SDK?

No. The Visual Editor is designed to quickly create a launcher theme without needing to write any code. If you wish to use the SDK, you’ll need to create the theme manually using HTML, CSS, and JavaScript.

Can I use the visual editor with a Unity launcher?

No. The Visual Editor is built for the Electron-based launcher.

What happens if I delete a theme version?

If you delete the latest version, the launcher will revert to the previous version. If there’s no earlier version, the launcher will use the default theme.

My game is currently using a Unity (default or custom) launcher. How can I migrate?

Simply choosing a theme for your game application will prompt it to download the Electron launcher in place of the Unity launcher. If something goes wrong, you can easily switch back to your Unity launcher.

I’m missing a feature…

Please contact us and let us know which feature you’re missing. We’re constantly working on improving the visual editor, and your feedback is crucial to us.

SDK 1.0

The SDK version 1.0 is now deprecated. If you’re looking for the documentation of the previous version, please click here.

SDK 2.0

Initial Release date: 2023-07-23

The Electron Launcher SDK is a tool that enables the development of PatchKit electron-based launcher themes in a lightweight development environment, consisting of a web browser window and a code editor of your choice. The SDK allows mimicking different states of the launcher to test how custom code would look and behave. The launcher is built on the Chromium web engine; therefore, we recommend using a Chromium-based web browser.

Please note that the launcher theme code is responsible for both the appearance and behavior, such as user flow. For instance, you can trigger the authentication logic before the user can install the game.

Requirements

To start working with the SDK, you need a few things installed on your development machine:

  • NodeJS (we recommend nvs and NodeJS v16.16.0)
  • A package manager of your choice (we recommend yarn, although both npm and pnpm should work as well)
  • An App Catalog on PatchKit Panel (you can create it here)

Quick start with an example project

To assist you in bootstrapping your launcher, we recommend downloading the example project. Simply download the patchkit-example-launcher.zip archive and unpack the contents into a directory where you will be working on your launcher.

Now, you need to run theme and the runtime components in that order (preferably in development mode).

cd theme
yarn
yarn start

After running yarn start you might see a number of warnings in the console. Please ignore them as they don’t affect the functionality of the example project.

Once your theme is running, start the runtime.

cd runtime
yarn

# Windows
yarn run-dev -p windows-preset.js -t http://localhost:3000

# macOS
yarn run-dev -p macos-preset.js -t http://localhost:3000

# Linux
yarn run-dev -p linux-preset.js -t http://localhost:3000

As you do that, you will see a launcher window appear. The library on games in it, is a library of games of PatchKit demo launcher, which you can easily switch to yours later on. The example project has hot-reloading enabled, so any changes you make in the theme will be instantly reflected in the launcher.

Basic concepts

The PatchKit Launcher SDK structures the project into two separate components:

  • Runtime - an application built on top of the Electron framework that supplies core functionality like installing and updating the apps, as well as window management, shortcut creation, and deep links.
  • Theme - a user interface built with frontend technologies, allowing you to completely customize your launcher. You can think of it as a front-end application with additional API exposed from the launcher.

These two components are deployed individually to allow quick updates of the theme without the need to rebuild the whole launcher. The deployment instructions are detailed in this section.

Runtime component

The runtime component consists of:

  • A package.json file that depends on two SDK packages: patchkit-generic-launcher2-dev-tools and patchkit-generic-launcher2-base-presets.
  • Presets
Presets

The concept of presets allows you to have different variants of your launcher. Common use cases for having multiple presets are:

  • To target multiple platforms (Windows, macOS, or Linux)
  • To separate development/internal and production versions of the launcher

Each preset is a JavaScript file placed in the src directory that exports the configuration object. This setup enables you to store shared configurations in separate JavaScript files and compose them with libraries like deepmerge. Please refer to the example project for details.

Configurable preset fields include:

  • id - Example: patchkit-demo-launcher. Required. Please note that it cannot be changed once the launcher is deployed.
  • name - Example: PatchKit Demo Launcher. Required. This is used in areas visible to the user.
  • description - Example: PatchKit Demo Launcher. Required. It usually matches the name, but you can use it to describe the specifics of your launcher.
  • companyId - Example: upsoft. Required. Please note that it cannot be changed once the launcher is deployed.
  • companyName - Example: Upsoft. Required. This is used in areas visible to the user.
  • iconFilePath - Example: require.resolve("./icons/windows.ico").
  • secret - Example: aabbccddeeffgghhiijjkkll11223344. Required.
  • appsCatalogId - Example: aaaaaaaa-bbbb-cccc-dddd-eeeeeeeeeeee. Required. You can find this in the list of your App Catalogs on PatchKit Panel.
  • isAppsBranchesNotDefaultRootDirAllowed - Default: false. This determines whether to allow installing apps in any directory (not just the default ones).
  • window
    • defaultSize - Default: { width: 1024, height: 768 }.
    • defaultMinSize - Default: { width: 1024, height: 768 }.
    • defaultMaxSize - Default: { width: 1024, height: 768 }.
    • defaultIsResizable - Default: false.
    • isBorderless - Default: false.
    • isTransparent - Default: false.
    • areCornersRounded - Default: true.
  • protocol - Default: undefined. Example: { "id": "patchkit-demo-launcher" }. This allows you to configure the deep link functionality for your launcher so it can be opened from web links like patchkit-demo-launcher://action.
patchkit-generic-launcher2-dev-tools

This package provides the scripts required to start the launcher in development mode as well as to build it:

  • run-patchkit-generic-dev-launcher2:
    • required -p or --presetFileName
    • required -t or --overrideThemeUrl
  • build-patchkit-generic-prod-launcher2:
    • required -p or --presetFileName
    • required -v or --version
    • optional --appleId
    • optional --appleIdPassword

You can use these scripts:

  • Directly with yarn, for example yarn run-patchkit-generic-dev-launcher2
  • Directly with npx, for example npx run-patchkit-generic-dev-launcher2
  • By aliasing them in the scripts field of package.json (please refer to the example project)
patchkit-generic-launcher2-base-presets

This package provides presets with default values that are commonly used across launchers built with the SDK.

Theme component

The theme is simply a user interface application built with web technologies, similar to a front-end. Please refer to the example project to learn how to utilize the API exposed from the launcher runtime to create the launcher user interface.

Possible routing issues

To ensure your launcher theme is compatible with the deployment option on the PatchKit Panel, you need to adjust the routing method in your application. Since the theme is going to be deployed in a subdirectory, you can’t assume the absolute path to your application at build time. Therefore, we recommend using solutions like HashRouter from react-router to avoid any issues after deployment.

Building and deployment

When you’re done working on your launcher, you need to build it.

Building and deploying the Runtime component

To build and deploy the launcher, follow these steps:

  1. Open the PatchKit Panel.
  2. If you already do have an Electron Launcher application, skip to step 7.
  3. Navigate to the Applications page.
  4. Click the New Application button and then choose New Custom Electron Launcher from the popup.
  5. On the next form, provide the Electron Launcher name and platform, and then click the Create button.
  6. Copy the Secret field to the clipboard.
  7. Fill the secret property in specific preset file (like windows-preset.js).
  8. Run the build-prod command with specific parameters:
cd runtime

# Windows
yarn build-prod -p windows-preset.js -v 1.0.0 --upload --publish --patchKitApiKey yourpatchkitapikey

# macOS
yarn build-prod -p macos-preset.js -v 1.0.0 --upload --publish --patchKitApiKey yourpatchkitapikey --appleId yourappleid --appleIdPassword yourappleidpassword

# Linux
yarn build-prod -p linux-preset.js -v 1.0.0 --upload --publish --patchKitApiKey yourpatchkitapikey

This should build, upload and publish the launcher directly on your PatchKit account.

Your PatchKit API Key can be found here

Your new launcher is now online, but without a theme it will not display anything (or will generate an error). Please proceed to the next section to learn how to deploy the theme.

Building and deploying the Theme component

To build the theme, run:

cd theme
yarn build

This should create a build directory in the theme directory that contains the built theme. Then:

  1. Visit the PatchKit Dashboard and sign in.
  2. In the left sidebar, click on the Launcher Themes link.
  3. Press the New Launcher Theme button.
  4. Click the New Version button.
  5. Choose the theme file (.zip format) and click the Upload button (you can ignore the Launcher Version field for now).
Understanding the Launcher Version Field

The Launcher Version field is used to indicate the launcher version compatible with the theme. If left empty, it will default to the highest defined version or 0.0.0 (compatible with all). If a launcher version is specified, the theme will only be compatible with that specific version and newer versions sharing the same major version number.

For example, if you specify 1.0.0 as the launcher version, the theme will be compatible with launcher versions 1.0.0, 1.0.1, 1.0.2, 1.1.0, 1.1.1, 1.2.0, 1.2.1, and so on, but not with launcher versions 2.0.0, 2.0.1, 2.1.0, 2.1.1, etc.

On the launcher version page, you can find all launcher versions sorted by their release date. The most recent version is at the top. If multiple versions have the same version number, the one with the latest release date takes precedence and will be used by the launcher.

Associating a Theme from the Launcher Themes Page

A newly uploaded theme is not immediately available to users. To make it accessible, you must associate it with a specific launcher app. You can do this from the Launcher Themes page in the PatchKit Dashboard or through your launcher app settings.

  1. Visit the PatchKit Dashboard and sign in.
  2. In the left sidebar, click on the Launcher Themes link.
  3. Press the Edit button next to the theme you want to associate.
  4. Click the Assign to Launcher button.
  5. Choose the launcher app you want to associate the theme with, and click the Assign button.
Associating a Theme from Launcher App Settings
  1. Visit the PatchKit Dashboard and sign in.
  2. In the left sidebar, click on the Applications link.
  3. Select the name of the launcher app you want to associate the theme with.
  4. From the Launcher Theme list, choose the theme you want to associate and click the Save button.

Now, your users can access the theme you’ve uploaded. The launcher may need to be restarted for the changes to take effect.

Sharing your launcher

Once both the runtime and theme have been uploaded, you can distribute your launcher to the end-users. You can do so by navigating to your launcher application page on the PatchKit Dashboard (the Overview tab) and finding the Download Link in the Details frame on the right side of the page.

FAQ

Do I need to update the launcher each time I update the theme?

No, you don’t. The launcher is responsible for fetching the latest version of the theme from the PatchKit servers. Therefore, you can update the theme without the need to update the launcher binary.

When should I update the launcher binary and what changes can I expect?

You should update the launcher binary (the runtime component) only in two cases:

  1. You modified the presets
  2. You upgraded the SDK version

For the list of changes, please visit this page.

Should the launcher pop up as a window when I run it?

Yes, the launcher should pop up as a window every time it’s executed.

What if the launcher doesn’t show up even after the process seems to start successfully?

There could be multiple reasons for this, one being potential issues with Windows 11’s features of restoring apps. You might need to look for specific executable instances and close them or restart your computer.

Where can I find the logs for the launcher?

The logs are usually located in runtime/temp/your-launcher-id/dev-user-data/logs/logs.yml.

What should I do if the logs are empty or not found?

If logs are not available, please consider reaching PatchKit Support and giving us details about the issue.

How do I connect my application with the launcher?

You need to make sure that you’re using the correct ‘secret’ from your PatchKit application settings.

Can I upload a theme using the command-line tool?

Currently, themes cannot be uploaded via the command-line tool, but this might be considered for future versions.

How does the auto-update feature work regarding version labels?

Version labels need to be in x.y.z format and should match with the version you pass using the -v argument. Each new version should have a unique label.

Yes, deep links are fully supported.

How can I test the launcher with a protocol in dev mode?

First, start the launcher with run-dev. After that, protocol requests should be received.

How should I use Patchkit for different environments like prod and dev?

Some clients use a double launcher setup with a production launcher connected to their production app catalog and an internal launcher connected to the internal app catalog. You can also utilize branches, but managing them in your theme is necessary.

Can I retrieve values from the current preset.js in the theme?

No, currently, the SDK doesn’t support retrieving values directly from preset.js in the theme.

How can I detect the launcher runtime my theme is currently running in?

You can use different launcher IDs to distinguish between different launchers. The ID from patchkit-launcher2-api-theme-client package corresponds to the id field from your preset.

How do I revert to a previous version of a theme?

To revert to a previous version of a theme, you must delete all newer versions of the theme. You can do this from the Launcher Themes page in the PatchKit Dashboard by clicking the Delete button next to the version you want to remove.

results matching ""

    No results matching ""